Handing over a check for roof work you cannot really see can feel unsettling. The crew is gone, the yard looks clean, and from the street the roof seems “fine,” but you are not completely sure what a proper repair should look like. That hesitation is normal, especially after East Trenton storms have already tested your home.
One strong wind-driven rain or a heavy snow can expose a weak spot quickly. If a repair detail was rushed or skipped, the next storm can mean stained ceilings, damp insulation, or another emergency call. A careful review right after the job, and again after the next steady rain, gives you a chance to catch obvious problems while your contractor is still close to the work.
At Joe The Roofer, we walk our own crews through a similar checklist at the end of every repair. We work on roofs across New Jersey’s toughest weather, so we know where repairs tend to fail first. The steps below mirror that process so you can confidently review the work on your East Trenton home before final payment and know what to ask if something does not look right.
Why A Post-Repair Checklist Matters In East Trenton
Roof repairs in East Trenton often follow familiar storm patterns. Nor’easters push rain under lifted shingles. Ice dams back water up along eaves. Summer thunderstorms drive wind and debris across aging sections. Most repairs focus on one problem area, but that patch still has to stand up to the same weather that caused the damage.
Because repairs usually involve only part of a roof slope, they can be more vulnerable than full replacements if details are not handled carefully. Wind looks for loose shingle edges. Driving rain finds small flashing gaps. Freeze-thaw cycles open poorly sealed nail holes or thin caulk lines.
Many homeowners assume that if the leak stops immediately, the repair was done correctly. In reality, some issues do not show up until the next heavy rain or until moisture slowly darkens the roof deck in the attic. You do not need to climb onto the roof to catch most red flags. A careful ground-level review, a quick attic check, and a look at your paperwork can uncover concerns early.
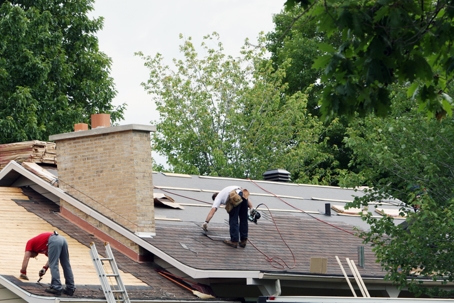
Start With A Safe Ground-Level Inspection
Begin with a simple visual scan from the yard. Step back far enough to see the full repaired section and compare it to the surrounding roof.
Look for:
- Straight, even shingle rows (courses). The repaired area should align with the rest of the roof and not appear wavy or uneven.
- Consistent shingle style. Slight color differences are common when new shingles meet older ones, but size and layout should match.
- No lifted or curling edges. Raised tabs can catch wind and may not be properly fastened.
- No exposed nail heads. On asphalt roofs, nails should be covered by the shingle above. Visible metal can become future leak points.
- Clean ridge caps and valleys. These should sit flat and follow straight lines.
Heavy blobs of black or clear sealant smeared across shingles are worth noting. Sealant has a role, but it should not replace proper layering and fastening.
Use binoculars or your phone’s zoom to take clear photos from different angles. Wide shots and close-ups create a record of how the roof looked immediately after repair. At Joe The Roofer, we perform similar ground-level checks before closing out a job because many small issues are easiest to spot from the yard.
Examine Flashing, Vents, And Roof Penetrations
The most vulnerable areas of any roof are where the roofing meets something else. Flashing is the metal installed around chimneys, skylights, walls, and transitions. When repairs involve these areas, proper flashing detail matters as much as the shingles.
From the ground:
- Flashing should sit straight and tight against chimneys or walls.
- Metal pieces should tuck under shingles, not sit loosely on top.
- You should not see flashing bent outward or heavily globbed with sealant.
- Water should flow over flashing and onto shingles, not behind the metal.
Check plumbing vent pipes and exhaust vents. Each pipe should have a vent boot integrated under surrounding shingles. The rubber collar should sit snugly around the pipe. New boots should look intact and flexible, not cracked or brittle. If your estimate included vent boot replacement but they appear old or deteriorated, that deserves clarification.
Sealant should look neat and purposeful, not smeared widely to cover visible gaps. At Joe The Roofer, we focus heavily on proper flashing installation because New Jersey rain and snow tend to expose shortcuts quickly.
Check The Attic And Ceilings After The Next Rain
Exterior appearance is only part of the story. After the next steady East Trenton rain or melting snow, inspect your attic and nearby ceilings.
Using a flashlight, look at the underside of the roof deck in the area below the repair. Watch for:
- Darkened or damp wood
- Shiny wet spots
- Matted or discolored insulation
- Musty odors in previously dry areas
Water does not always drip straight down. It can travel along rafters before falling elsewhere. If you notice new dampness within the same general zone as the repair, document it with photos.
Also check ceilings below for new stains, bubbling paint, or faint discolored lines. We routinely combine attic and exterior checks because a roof can look fine from the street while still allowing minor moisture intrusion.
Repeating this attic check after a significant storm gives you confirmation that the repair holds up under real East Trenton weather.
Evaluate Cleanup And Debris
Cleanup reflects the care taken on the roof itself. Walk around driveways, walkways, planting beds, and lawn areas where the crew worked.
Look for:
- Shingle scraps or plastic wrapping
- Loose nails
- Excess granules or debris in gutters
Professional crews typically use magnetic sweepers to collect nails. A few stray nails can happen, but finding many may indicate rushed finishing. Nails left behind can puncture tires or injure someone.
If you can safely see into gutters from the ground or a window, check for heavy shingle debris. Clogged gutters can overload roof edges during the next storm, stressing the repaired section.
At Joe The Roofer, we treat cleanup as part of the repair itself. A clean property reflects careful workmanship.
Compare The Work To Your Estimate And Warranty
Sit down with your contract and review what was promised.
Check whether items listed in the estimate, such as replacing shingles, installing new flashing, or changing vent boots, appear to match what you can observe. You do not need to know every technical detail. You are simply confirming that visible changes align with what you paid for.
Next, review warranty information:
- Material warranty: Provided by the manufacturer for shingles or components.
- Workmanship warranty: Provided by the contractor covering installation quality.
Confirm how long the workmanship warranty lasts and whether there are conditions attached. If details are unclear, request written clarification while the job is still recent.
At Joe The Roofer, we clearly outline warranty terms and use reputable materials with documented coverage.
Talk With Your Roofer Before Final Payment
Schedule a brief walkthrough or photo review with your roofer before releasing final payment. Ask them to show close-up images of flashing, fasteners, or areas not visible from the ground.
Prepare specific questions, such as:
- Why do certain shingles look slightly different?
- Was new flashing installed at the chimney or just resealed?
- Were vent boots replaced or repaired?
- What should I monitor over the next few months?
Use your notes and photos as a punch list. Clear, fact-based questions keep the conversation productive. A responsive roofer should address concerns directly and schedule follow-up visits if needed.
At Joe The Roofer, transparent communication and photo documentation are standard parts of closing out a job.
When To Seek A Second Opinion
If the next storm reveals continued leaking, if visible defects remain unaddressed, or if your contractor avoids follow-up, consider getting a second opinion.
Reasons to call another roofer include:
- Persistent leaks after heavy rain
- New ceiling stains under the repaired area
- Open flashing gaps or cracked vent boots
- Repeated missed follow-up appointments
Have your photos, estimate, and invoice ready. Sharing documentation helps the new roofer understand what was done and evaluate next steps.
Sometimes a deeper issue, such as deteriorated decking or missing underlayment, requires more than a surface patch. In some cases, a broader solution may be more cost-effective long-term. Financing options can make larger corrections manageable when needed.
Feel Confident About Your Roof Repair
A completed roof repair should not leave you guessing. With a careful ground-level inspection, an attic check after the next storm, a review of your paperwork, and a direct conversation with your roofer, you can confirm whether the work on your East Trenton home was done properly.
If your checklist raises concerns or you simply want a professional review for peace of mind, Joe The Roofer is ready to help. We provide New Jersey-tested roofing solutions, strong warranties, and clean, respectful workmanship on every project.
Call (732) 490-7733 to discuss your roof repair concerns or schedule a professional inspection.